Saturday, March 5, 2016

DIY Catch All Dish


Hello my luvs! Hope you're all having a fantastic day! Today's DIY has been one I've been wanting to do for a while. And if you follow me on Instagram you've already had a sneak peek! Today I'm going to show you how to make your own catch all dish. These have been all over social media and I honestly have been wanting one. I've been needing one for awhile now and just haven't gotten around to it until now. Anyways, I think you guys will really enjoy this DIY.
I'm going to show you how to create the dish and decorate it, but you could also use a clay or ceramic dish you already have.
For this project you will need...
  • An air dry or oven bake clay
  • Acrylic paint
  • Fine tipped paint brush
  • Pencil or pen
  • Small bowl
To start, you'll want to create your dish. Unfortunately, my hands were very messy while doing this so I couldn't get any pictures(so sorry, I hope my explaining will make sense!)Basically, you're just going to knead the clay and then roll it into a ball. Then, flatten the ball and continue to flatten to your liking. Then I sat a small bowl on top of my clay and using scissors traced around the bowl to cut a perfect circle. Next, lay the clay inside the bowl and let it dry. This will cause the clay to hold a bowl-like shape.
Then I let my bowl dry for a few hours and took out of the bowl it was sitting in. The bottom was still damp because it wasn't getting any air while sitting in the bowl, so I sat my clay bowl upside done and let it finish drying over night.
You can stop here if you want, but wanted to take things a step further.
To finish it off, I drew a design on my bowl in pencil.

Then I used some brown acrylic paint and the thinnest paintbrush I have to make it bold.
Finally, I gave it a quick coat of ModPodge to protect my design.
And I was done!
I really like this project and think it would be cool to make an even bigger bowl. Not like super big, but big enough to hold something like sunglasses. My dish came out pretty small so I use it to hold my bobby pins, or at least the few I haven't lost(ya know how it is, you buy a big pack of bobby pins and somehow loose them and never EVER know how!).
Let me know in the comments what you thought and what you want to see next! Use the #DIYAroundTheClock to show me your creations on Instagram! Love you all!
Love,

Friday, January 29, 2016

DIY Inspiration Board


Hello my luvs! I hope you all are having a fantastic day! Today we are really getting down to business. I know lots of people like to make New Years resolutions. I typically don't but this year I did. I promised myself I would get into shape and start to get outside of my comfort zone. I mean lets face it, most of us love our comfort zones and I've loved mine for too long.
"But why are you telling us this?" you may be asking. Well guys, part of the reason I typically don't make New Years resolutions is because I don't keep up with them when I do, but this year I really want to keep my resolution. "But how are you going to do that?" you may be wondering. Well that's exactly what today's DIY is for!
Today we will be making Inspiration Boards! These will help motivate us to keep our resolutions and get more done.
For this lovely DIY you'll need...
  • Images from a magazine or printed(if you print you can get pictures from you Instagram or Facebook or Pinterest)
  • Any glue or tape(I used an Elmer's glue stick and washi tape)
  • Any type of board(you know like a wood board or foam craft board) or a canvas
  • Optional items such as paint or decorations
Let's get to it!
First, if you want to paint your board or canvas do that. I used a piece of poster board and I liked it white so I didn't paint it.
Then, collect your cutout magazine pictures or printed pictures. I actually ended up only using printed pictures. Whatever it is you do make sure that they'll motivate you to do what it is you want to achieve. I want to work on my music so I picked pictures of my favorite musicians. I also want to get fit so I added pictures of people doing yoga and running. I actually even added inspiring quotes.

Next I wrote a quote on the top of mine but you don't have to. I wrote, "If you can dream it, you can do it" because I thought it might inspire me even more.

Then place your pictures on your board or canvas and tape or glue them down. I first glued mine and then added pieces of washi tape to add more color.

Finally, decorate it if you want and you're done!
Just hang it up and be inspired!

Hope you all enjoyed this DIY. I know this is now definitely one of my favorites and I hope you all give it a try.
Let me know in the comments what you thought and what you think I should try out next.
P.S.
I'm now on Instagram AND Pinterest! I'm working on getting a Facebook page and Snapchat going!

Thursday, December 31, 2015

Easy Crochet Bow Headband


Hello luvs! Hope all of you are having a great day! Today I'm going to be showing you all how to crochet an easy bow headband. And when I say easy, I mean easy. The only stitch you have to know for this project is a double crochet. You could even use a single crochet or half double crochet instead of a double crochet. 

For this project you will need...

  • A skein of worsted weight yarn
  • A 6.50 MM crochet hook
  • A pair of scissors
Let's get started!

First you want to make a chain long enough to fit around your head.

Then chain two and in the third chain do a double crochet. Double crochet in the rest of your chains. Now you want to chain two and in the third stitch double crochet. Double crochet in the rest of the stitches. Repeat these steps until your band is as wide as you want it. When your band is as wide as you want it, fasten it off.

Now take your two ends of the band and place them together. Take some of your left over yarn and tie it to one corner. 

 Now weave the yarn in and out of both sides of the band. Fasten off when you get to the end.

Put your band off to the side, now we're going to work on the bow.

Make a chain as wide you want your bow to be. Then chain two and in the third stitch double crochet. Double crochet in the rest of the chains. Repeat until your rectangle is a big as you want it to be. Keep in mind that we're going to be folding this rectangle in half.

When you're done your rectangle fasten it off. Now take that rectangle and fold it in half. Stitch around all the open sides the way we stitched the band. Leave a little opening for us to flip the rectangle inside out. Make sure you fasten it off before you flip it inside out!

Now you can either stuff your rectangle or just stitch it shut. I chose to stuff mine.

Now pinch your bow in the middle. Take some yarn and tie it around the bow right where you've pinched it. Then continue to wrap yarn around the middle until your satisfied with it. When you're satisfied tie the yarn.

Now you can either stitch your bow to your band or glue it. I chose to stitch it to the band.

Now your done!

Hope you all enjoyed this project! I actually gave this one to my sister and she loved it! I hope you all give it a try.

Let me know in the comments what you thought of it and what you think I should try next!

Love,

Thursday, November 12, 2015

How To Sew A Simple Rug

Hello! Today I'm going to be showing you all how to sew a simple rug. I don't know about you guys but personally when I came up with the idea to make my own rug I was a little scared. I don't why but the idea of making my own rug just seemed a little frightening. Anyways, it's actually super easy!

Here's what you need...
  • A fabric of your choice(amount will depend on the dimensions of your rug. I got mine out of a scrap bin at A.C.Moore)
  • Thread
  • Scissors(Fabric scissors are much easier to cut with than regular scissors!)
  • A sewing needle or sewing machine

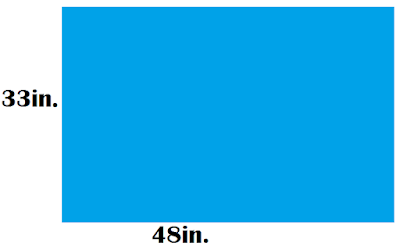
First you need to figure out how big you want your rug to be. Here's a graphic of the dimensions I used. 

You can make yours a rectangle, square, triangle, or whatever. It's about what you want it to look like. 

Then we're just going to hem all of the sides. 

I didn't want my thread to be visible so I made sure to choose a matching one. Here's what my hem looked like. If you look closely you can see my thread.


After hemming I was done! All did was put it in place. If you'd like your rug to have more of a cushion to it you can buy a rug pad to put under it. I personally didn't bother but it's up to you. Here's how mine turned out. I know my picture isn't the greatest, but I lost my good camera so I took it with an old one. Sorry guys.

I hope you guys enjoyed this tutorial. Let me know in the comments what you thought and what you think I should try next. Hope you all have a fantastic day.
Love,